Striving to be a perfectionist, (or rather the closest thing since there is no such thing as perfect), never makes work finish faster but can make it look better. I almost always find myself taking more time into modeling then I originally intend to, sometimes even pulling all nighters just to fix a few minor problems. It's like an addiction sometimes, the same way playing RPGs can be.
FMG-9
Because FMGs are SMGs, (sub machine guns), that can transform from looking like a box or a mini brief case into a deadly weapon I wanted to build the FMG-9 not just as a single gun model piece but as a transforming model from gun to box mode. To do this and make it able to animate I had build the FMG-9 in several separate model pieces all parented with one another that could move, rotate, and align properly the same way an FMG would in reality when transforming. Below are the wireframes to the FMG-9 model pieces.


FMG-9 gun mode

FMG-9 in mid transformation

FMG-9 in box mode, looks like a harmless brief case now doesn't it.
Tanwen Body
By the end of Milestone 5 I had the head and torso section of Tanwen built, Since then I've made a number of edits and modeled the limbs. It's easiest to build a characters' body in several pieces first then attach them. I like to build the head, body, hands and feet all separately first then model the arms and legs from the hands and feet then align all pieces and attach them. I always make the eyes, teeth, mouth interior, and hair, (if the character has any), separate objects grouped with the rest of the body. Below are the wireframes to one of Tanwens' feet.
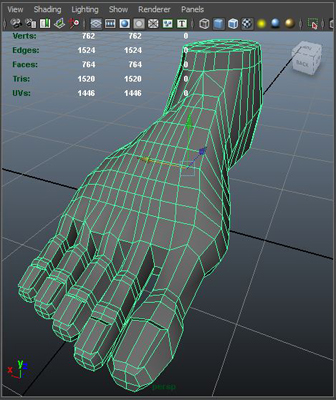
Most people seem to find hands harder to model or draw then feet where as I've almost found hands easy for some reason myself while feet are bite harder to do. Below are the none colored renders of the foot for all of you viewers that have foot fetishes, enjoy!

The right foot after being modeled with polygons.

The right foot after being smoothed to help make it look more organic.
Modeling hands aren't as easy as drawing them by any means in my opinion but still much easier than it is to model or draw feet, (at least human feet that is). Feet like what Mythras, Khajiits, Sahuagins, Astechiques, Voljerahs and other animals with inverted legs like what dinosaurs, birds, exc. have are practically natural to me, maybe because of my childhood obsession with drawing dinosaurs and other similar creatures like dragons. Whatever the case, the bottom line is while I draw a lot humans, I find humans to actually be some of the hardest organisms to draw or for that matter model. Below are the wireframes for Tanwens' right hand.

Hands are said to be one of the most complexed and advanced parts of the human body considering the flexible fingers and thumbs that few other animals have. Below are the none colored renders of the hand.


Right hand after being smoothed.
When showing the head and torso model in the last Milestone, I used some parts from a previous human female model I did to work off of although I wanted to make some changes or improvements for that matter all due to the fact that I strive to be a perfectionist. Below are the wireframes to Tanwens' torso followed by the renders.

The left and right sides of the torso.

Side view of the torso and its' wireframes.

Torso Rendered

Torso after being smoothed
The head is by far the hardest part of a character to model, almost everyone who does 3D computer models would say that. There are often more details and polygons with in the whole head and face area of a character than there are anywhere else in the entire character model and capturing all those details like the nose, cheeks, jaws, eye lids, exc. along with making them all the right proportions and on top of all of that, if you ever plan to animate them, is a pain in the ass to say in the least. When modeling a head, start with one side, either the left or the right and when finished make a duplicate of it and mirror it to the opposite side by assigning it the opposite scale value in the attributes editor. It doesn't hurt to do this every so often then undoing just to see how the head is looking as a whole. After finishing and and duplicating the head piece to the opposite side, combine the 2 pieces then start merging all the vertices's from the inner edges of the 2 head pieces in the center 1, or in this case 2 vertices's at a time. Kind of like connecting the dots. There are many other ways to do this of course as this is just how I like to do it.

Above is the wireframes to the left side of the head.

The left side of Tanwens' head after a quick render.
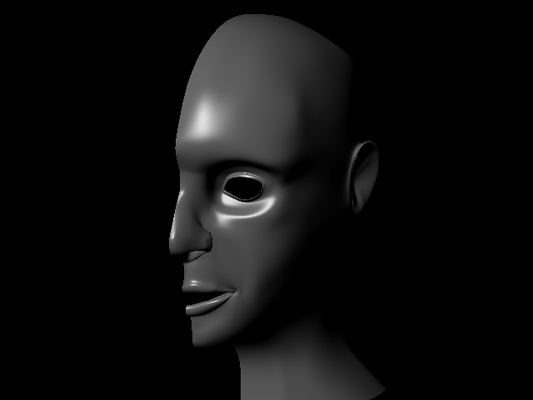
The left side of Tanwens' head after being smoothed.
After finishing the head and torso I modeled the arms and legs right off of the existing hands and feet then merged the pieces with the torso.

Wireframe

quick render

Smoothed
After all of the above, I duplicated the whole model piece and flipped it over to the other side and merged the 2 pieces the same way I did with the head, then finally merged the head and the rest of the body together. The finished results are below.

Wireframe above, renders below.


With the majority of Tanwens' body done, only a few body details still need to be added in, including the hair of course, then comes the clothing followed by the texturing all of the pieces in the next Milestone.
No comments:
Post a Comment